
Creating floating shelves for books is a fantastic way to enhance your home décor while providing practical storage. These stylish shelve give the illusion of floating on the wall, adding a modern touch to any room. In this guide, we will walk you through the step-by-step process of how to make a floating shelf for books, ensuring that even beginners can achieve a professional result. With a few basic tools and materials, you can create a functional and aesthetically pleasing solution to showcase your favorite reads. Get ready to transform your space with custom elve that blend seamlessly with your interior design.
How Do I Choose the Right Wood for My Shelves?
Choosing the right wood for your floating shelves is crucial for both aesthetics and durability. When selecting wood, consider the weight of the books you intend to store and the overall look you want to achieve. Hardwoods like oak, maple, and walnut are excellent choices due to their strength and longevity, ensuring that your shelve can support heavy loads without sagging. These woods also offer beautiful natural grains that can enhance the visual appeal of your shelves. If you’re looking for a more budget-friendly option, plywood or pine can also work well, especially if you plan to paint or stain them. Remember, the thickness of the wood is also important; typically, a thickness of at least 1 inch is recommended to provide adequate support for your books.
How Do I Find the Studs in My Wall?
Finding the studs in your wall is a critical step in ensuring that your floating shelves are securely mounted. Studs are the wooden beams behind your drywall that provide the necessary support for heavy objects. To locate them, you can use a stud finder, a handy tool that detects changes in the wall density, indicating the presence of a stud. Simply run the stud finder along the wall and mark the edges of each stud. Alternatively, you can use the “knock test” by tapping on the wall and listening for a solid sound, which signifies a stud, compared to a hollow sound where there is none. Another method is to look for clues like electrical outlets or light switches, which are typically mounted on the side of a stud. Ensuring that your shelv are anchored into studs will provide the stability needed to hold your books securely.
Materials Needed:
- Wood Boards (Choose A Sturdy Wood Like Oak Or Pine, Typically 1-Inch Thick)
- Brackets (Invisible Or Floating Shelf Brackets)
- Wall Anchors (If Attaching To Drywall)
- Wood Screws
- Level
- Drill
- Measuring Tape
- Stud Finder
- Sandpaper
- Paint Or Stain (Optional)
- Paintbrush Or Cloth (For Finishing)
Tools Needed:
- Drill
- Screwdriver
- Level
- Measuring Tape
- Stud Finder
- Saw (If You Need To Cut The Wood To Size)
- Sandpaper
Instructions
1. Measure and Plan

Before starting any construction, measure the space where you plan to install your floating shelves. Determine the length, width, and height to ensure the shelves will fit perfectly and provide adequate storage. Planning also involves deciding on the number of shelve and their placement, making sure they align with the studs in the wall for proper support. Sketch out your design to visualize the final product and gather all necessary materials and tools.
2. Cut the Wood

With your measurements in hand, cut the wood to the desired lengths for your shelves. Use a saw to make precise cuts, ensuring each piece is straight and even. Sand the edges and surfaces to remove any splinters and achieve a smooth finish. If you’re using hardwood, take extra care while cutting to avoid damaging the wood. Cutting the wood accurately is crucial for creating shelves that fit together well and look professional.
3. Find the Studs

Locating the studs in your wall is essential for securely mounting your floating shelve. Use a stud finder to identify where the studs are, marking them with a pencil. This step ensures that your shelves will be anchored into solid wood, providing the necessary support to hold the weight of your books. Accurate stud placement will prevent your shelve from sagging or falling.
4. Install the Brackets
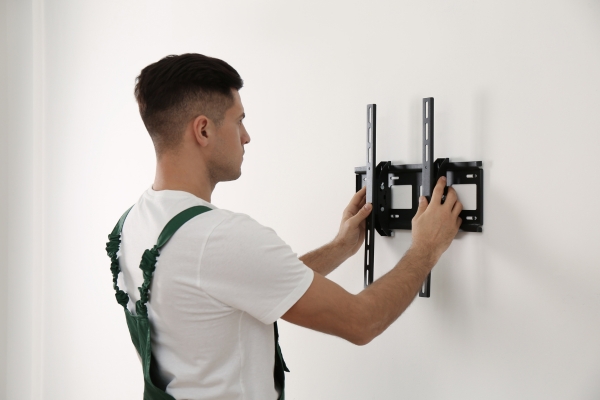
Once the studs are marked, install the brackets that will hold your Book shelves. Choose sturdy, heavy-duty brackets designed for floating shelve. Align the brackets with the stud marks and use a level to make sure they are straight. Drill pilot holes into the studs and then screw the brackets into place. The stability of the brackets is critical for the overall support of your shelves.
5. Prepare the Shelves
Prepare the wood pieces for installation by attaching any necessary hardware, such as screws or anchors. If you plan to paint or stain the wood, do so at this stage. Apply a primer if you’re painting, or a wood conditioner if you’re staining, to ensure an even finish. Allow the paint or stain to dry completely before proceeding. This step personalizes your shelves and protects the wood from wear and tear.
6. Mount the Shelves

With the brackets securely in place and the wood prepared, it’s time to mount the shelve. Carefully place the wood onto the brackets, ensuring a snug fit. Use screws to attach the shelves to the brackets, drilling pilot holes if necessary to prevent splitting the wood. Double-check that each shelf is level and secure. Proper mounting is vital for the shelve to hold the weight of your books without tilting.
7. Finishing Touches

Once your shelves are mounted, add any finishing touches to enhance their appearance. This could include adding decorative brackets, caulking any gaps between the shelve and the wall, or applying a final coat of paint or varnish for extra protection. These finishing touches can elevate the look of your shelve, making them a stylish addition to your home.
Conclusion
Making floating shelves for books is a rewarding project that combines functionality with aesthetic appeal. By carefully measuring, choosing the right materials, and securely mounting your shelve, you can create a beautiful and practical storage solution. Follow these steps to ensure your floating shelve are sturdy and stylish, providing the perfect place to display your favorite books.